
Best Practices for Writing Unit Tests in .NET
Good unit tests can make a project a joy to work on. They can be controversial however so here are, in my opinion, Best Practices for writing unit tests in a .Net environment.
Good unit tests can make a project a joy to work on. They can be controversial however so here are, in my opinion, Best Practices for writing unit tests in a .NET environment.
1. Reduce your Time to Feedback
Reducing Time to Feedback is one of the most effective ways to increase your productivity. As a developer, the time you wait after writing code and seeing what it does is time wasted. This is your Time to Feedback. When writing unit tests you can address this wasted time by:
- Using Live Unit Testing if you have Visual Studio Enterprise
- Otherwise, using NCrunch if you can get a license
- Failing that, learn the keyboard shortcuts to execute a test quickly - Ctrl+R Ctrl+T (for Run Test) while in a test method or class, Ctrl+R Ctrl+F (for Run Failed)
I have recently started using Live Unit Testing, and it executes the tests without me even saving. My Time to Feedback is as low as it could possibly be!
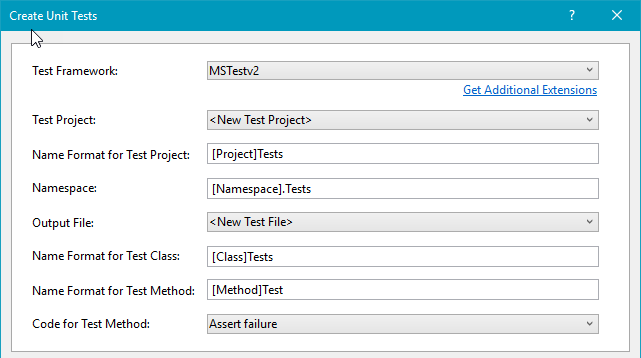
2. Use the Create Unit Test Context Menu
Visual Studio has a great way to quickly create a unit test stub - just right click on any method and choose Create Unit Test. The defaults are pretty good and it will help create consistent naming conventions for projects, files and classes.
3. Use Variables Named expected and actual
If you can, create a variable called expected with the value that you are expecting the method under test to return. Have another variable called actual that you set to the actual return value. This helps other people to understand the intent of your test. See the next point for an example.
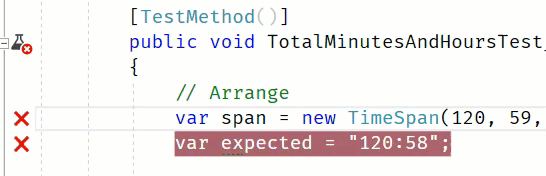
4. Use Arrange Act Assert
Sometimes it can be hard to decipher what part of a unit test does what. One way to alleviate this is to seperate your unit test code into three parts - Arrange, Act and Assert. In the Arrange section you set up all your variables and your expected result. In the Act section you call the method that you are trying to test. In the Assert section you have your assert statements. Here is a simple example:
// Arrange
var span = new TimeSpan(120, 59, 0);
var expected = "120:59";

// Act
var actual = span.TotalMinutesAndHours();

// Assert
Assert.AreEqual(expected, actual);
5. Have a Useful Failure Message
If your unit test fails and you use Assert.IsTrue(expected == actual) you will see the very unhelpful text
Message: Assert.IsTrue failed.
It is best to use Assert.AreEqual if you can which will give you something more useful
Message: Assert.AreEqual failed. Expected: <120:59>. Actual: <5:00:50>.
If you need to use Assert.IsTrue for something more complex always include the second parameter with a helpful message, eg
Assert.IsTrue(actual > expected,
    $"Actual: <{actual}> was not greater than Expected: <{expected}>");
Even better still would be to use something like Shouldly, which I discovered from a recent Scott Hanselman post.
// -> Expected 2 but was 1
Assert.That(map.IndexOfValue("boo"), Is.EqualTo(2));

// -> map.IndexOfValue("boo") should be 2 but was 1
map.IndexOfValue("boo").ShouldBe(2);
Also, it looks like the main contributor is Jake Ginnivan who I met at NDC Sydney 2017, who ran the React workshop, but is also an Open Source .NET master!
6. Use Red, Green, Refactor
Ideally you would write your tests first, which fail, and then the code to fix them. That isn't always the case, but either way you should initially have a negative test. That is, check that your test doesn't just always pass all the time. Break the code, or the test, so that it is initally Red. Then, implement away until the test passes, and you get Green. Once you have got your code covered by passing tests you can then happily Refactor, improving and refining your code knowing that it still produces the correct result. Red, Green, Refactor.
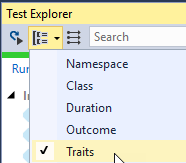
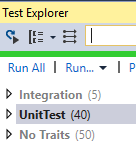
7. Use Test Traits to Distinguish Unit from Integration Tests
If your tests aren't all pure unit tests, you might find it useful to seperate tests with dependencies from those that don't, or long running tests from the others. One use case might be that you want your CI build to be quick but also have a nightly build that can take more time.
You can use the TestCategory attribute to achieve this:
[TestCategory("IntegrationTest")]
public void TestMethod()
Then in Test Explorer you can choose to group by traits:
So you can execute some test if you wish:
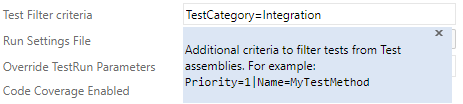
Then in TFS/VSTS you can set up the Test Filter criteria in your Visual Studio Test task:
This gives you greater flexibility to have both unit tests and integration tests and only execute the ones that makes sense for you at the time.
8. Your Tip Goes Here
Have your own tips? Let me know in the comments below. You can also let me know if you disagree, as I'm sure everyone has their own opinions!